Chest freezers are ugly beasts. If you don’t have an appropriate garage or other outbuilding then you’re stuck with keeping it in the house. Building a cabinet around it so it blends in with the rest of the kitchen helps to hide it well.
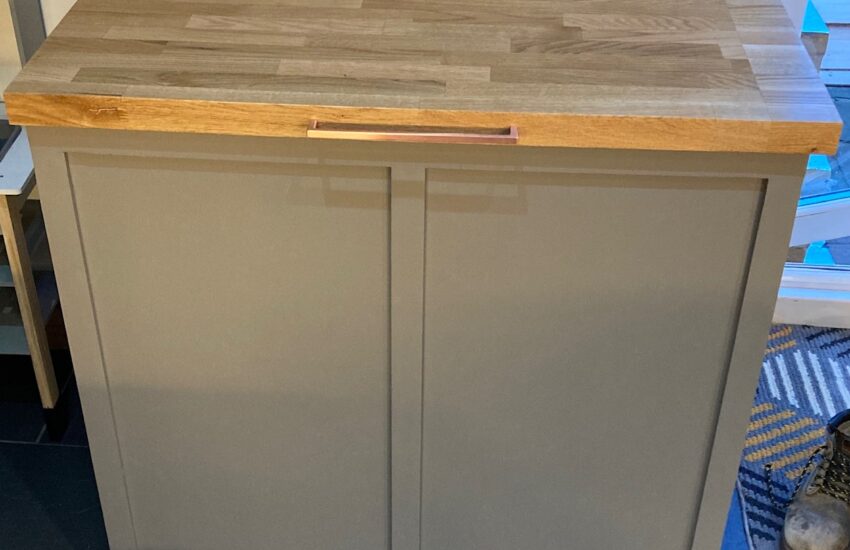
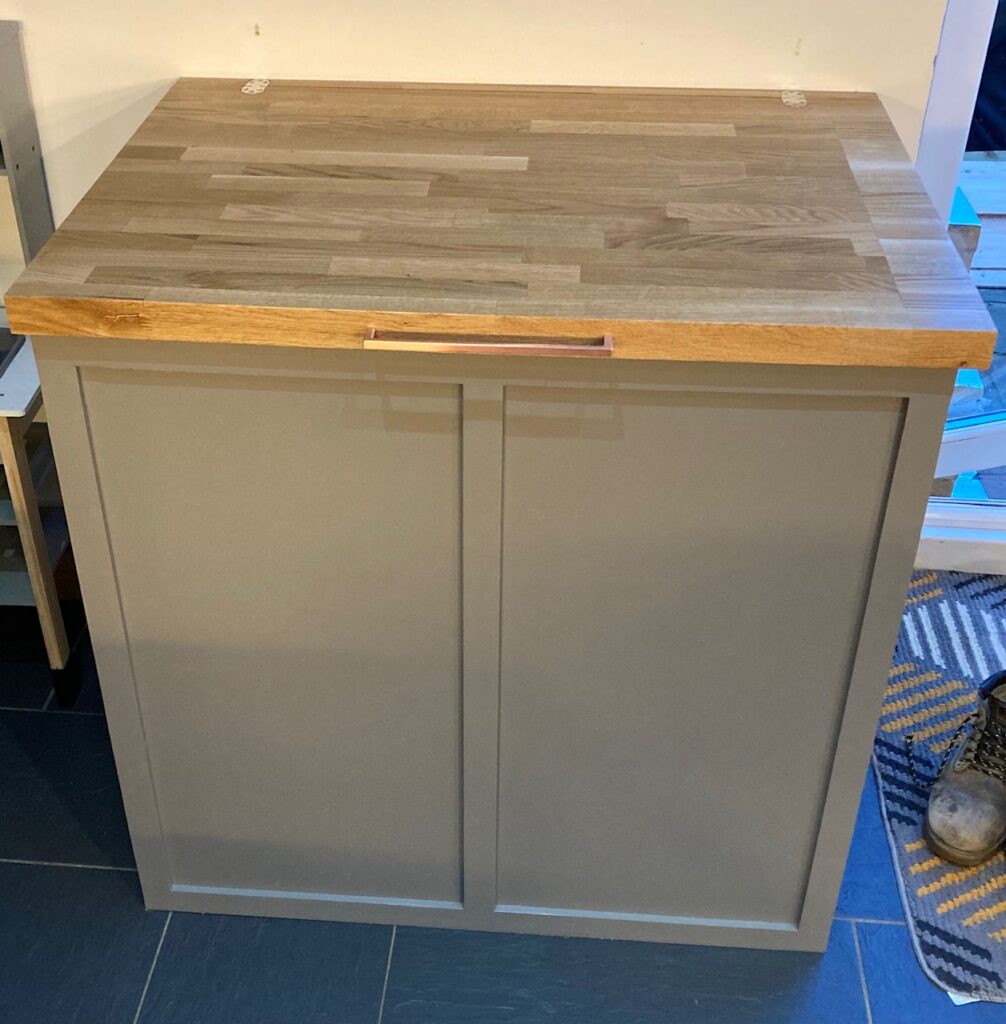
Finished Cabinet
Freezer
The freezer this cabinet was designed for is a Fridgemaster MCF198_WH Chest Freezer. It was £199 (before any discounts) at time of writing.
CAD Drawing
You can download the .skp file to import into SketchUp here: https://phil.lavin.me.uk/downloads/Freezer-Cabinet.skp

Handle
Because the lid is fairly heavy and the handle is a standard cupboard handle which screws in from the back, I had to modify it slightly. I drilled out the screw holes on the back of the handle to 5.5mm and then tapped them to a 6mm thread. I screwed 6mm threaded rod into this hole, approx 25cm long, then drilled 6mm holes about 25cm deep in the front of the worktop. Gorilla glue was applied into the worktop holes to fix the rod in firmly.
Lid Opening Mechanism
As the wooden lid opens, it also needs to lift open the lid of the freezer. This requires a sliding mechanism between the two lids. They are “Connect Fitting for Integrated Appliance Cabinet Doors”. Here’s what one looks like:

The idea is to allow the lid of the freezer to slide towards the back of the wooden lid as it lifts up. Here’s what that looks like, in practice:
Lid Supports
The lid is incredibly heavy and supporting it whilst rooting around in the freezer is a challenge. Gas struts can help with this. Gas struts are retracting tubes filled with gas which will automatically extend themselves and support a significant weight when they reach a certain level of manual extension. You very likely have them on your car boot and/or bonnet.
You can pick up gas struts from plenty of websites. These are the ones I used. Make sure you get ‘Adjustable Force’ struts. These come with a small screw on them which you can open to release some of the gas as even a 700N strut is incredibly strong and you will not be able to close the freezer lid without first releasing some of the gas. When adjusting the struts, it’s a good idea to do them individually. I.e. attach and adjust the first strut until you can close the lid with minimal downward force, detach the first strut, attach and adjust the second strut as with the first, attach both struts. If each strut can hold the weight of the lid individually, it means you haven’t over-adjusted one of the struts, as they may not come with exactly the same amount of gas in. Once both struts are fitted, you may want to release a tiny bit of gas from each of them to allow the lid to close easier but see how they feel.
There’s plenty of decent gas strut calculators online which will show you the strut force required for your application (I’d be very surprised if it was ever over 700N for a freezer!) but also the optimum fixing angles in terms of distance from the hinge, etc. Here’s a good one.
In my case, I bought has struts with a ball and socket joint on one end and a bracket on the other. The ball part of the ball and socket joint had an M6 bolt which screwed nicely into M6 insert nuts, fixed in with some gorilla glue and locktite. The bracket fixed to the wooden lid. I had to rout out large slots in the cabinet frame so the struts had somewhere to go when the lid was closed. To make this easier, you could just make the cabinet another 60mm or so wider so you have 30mm gaps either side of the freezer for the struts to sit in.
Another point to note is that, in the closed state, the struts are incredibly strong. This means they will pull the front part of the lid away from the back part with some significant force. This will, effectively, stretch your hinges… so make sure you use decent heavy duty hinges. Never unscrew your hinges without first detaching the gas struts! It will force the lid forward and rip your cabinet apart.
Photos of the gas strut fixings are below. Here’s a video of the mechanism. Please excuse the lack of paint – it still needs painting following the modification to add struts.
Construction Photos


Materials
The cabinet is made from the following materials:
- Frame: 40mm x 40mm planed square edge timber
- Panels: 18mm MDF
- Lid: 40mm white oak worktop
- Hinges: HAFELE Folding Table Hinges (Chrome)
- Handle: Second Nature Yard Cupboard Handle (224mm centres / satin copper)
- Gas Struts: 700N Adjustable Force Gas Struts
- Paint: Johnstones Water Based Satin (mixed to Farrow and Ball “Mole’s Breath” colour)
- Top Oil: Base coat of Osmo Wood Protector (Clear), Top coats of Osmo Top Oil (Clear, Satin)
How does the freezer door attach to the counter?
As covered in the blog post. Using sliding “connect fittings”. It’s important there’s a sliding mechanism in there, given the different opening angles of the lid and freezer
Are you able to make one for me? What’s your quotation?
I’d love to be a full time carpenter but sadly I have a day job which means I don’t have enough time. If you send this design to any good carpenter they will be able to construct it
Hi This is excellent! How can i ope the file?
You can sign up for a free sketchup account and then import the skp file into there. https://id.trimble.com/ui/sign_in.html
Hiya, this seems to be the only instructions I can find online to do this kind of thing. It’s great, well done!
Was just wondering how you attached the ‘Connect Fitting for Integrated Appliance Cabinet Doors’ to the freezer lid. Did you just drill it into the top of the freezer lid? I’m worried the screws would drill through the freezer lid. Thanks in advance for any further info!
Glad it’s helped you. I used self-tapping screws for metal to attach the fittings to the lid. The lid is only thin metal with a load of insulation inside but they’ve held well. For example these: https://www.screwfix.com/p/easydrive-wafer-low-profile-screws-4-8-x-16mm-200-pack/5004h
Only 16mm so no risk of going all the way through. No need to pre drill – they drill themselves
Great job! This helped me build my own for outdoor use. Do I need 1 or 2 of the connect fittings? Do I put 1 in the center or 2 on the front corners. Wished you had more pictures of the project. Thank you from Los Angeles.
You probably want 2 of them. I put one around 1/4 of the width from the left of the freezer and then another the same distance from the right of the freezer. It doesn’t matter too much as long as they’re broadly lifting the lid evenly.
You’ll want to get the fixing position of the freezer part of the connect fixing with the top lid open. This is easier said than done… I put some marking paint on the under side of the fixing then lifted the lid up to meet it, such that the lid now has the marking of the outline of the fixing on it. Given they’re plastic, there’s a tiny bit of play so you don’t need to be mm perfect
Hi,
Thank you for this guide – where did you get the worktop for your lid from?
Thanks
https://www.worktop-express.co.uk/
Have a look at a seller called The Chippy Shop on eBay. https://www.ebay.co.uk/str/thechippyshop
I’ve ordered worktop from them, a lot cheaper, a few times and it’s delivered by Worktop Express.
This is super awesome and an idea I was picturing in my head – except hadn’t thought through lid heaviness and wanting lid to stay put when lifted. And had pictured countertop and freezer lid both lifting separately. Thank you!! My concern is these units generally are recommended to have an inch or two space gap fro sides, back, and front. I can’t tell if in your design there is space between freezer lid and cabinet lid. Also would it get too hot in there, fire risk? Guess I could try asking a freezer manufacturer. Haven’t bought it yet and considering secondhand.
Heat has never been a problem. The vent for my freezer is on the bottom right side and you’ll see from the pictures that I fitted stainless steel louvre vents to the cabinet. There’s a decent amount of space at the back of the freezer because you need the clearance from the wall for the lid and counter to lift up. There’s an inch or so either side on mine but, were I to do it again, I’d leave a bit more space on the sides for the gas struts to go into rather than routing out big slots in the frame. There’s hardly any space between freezer lid and cabinet lid – only the space taken up by the sliding connectors. This isn’t a problem as the lid is just thin metal filled with insulation. All of the heat-generating stuff is down the bottom of the freezer.
Hi Phil.
My chest freezer is a little smaller than the one you designed, but I really like your design and I’m going to try and modify it to suit mine. I was going to have it free standing and have another mdf panel attached to the back if you thought that would work ok?? I was just wondering how you attached the mdf panels to the 40mm x 40mm planed panels? Did you cut the panels to size first, and then build the uprights around them with glue or did you create the wooden frame first and then attach the panels? The worktop I’m using isn’t quite as heavy as the one you’ve described, so my plan was to try it with the sliding hinges you describe, and then if necessary and the cylinder struts at a later date. I really like your work, thanks for posting!
Thanks for the comment Andy. I have a router table so I routed out rebates in the frame wood and then assembled it, with glue, around the MDF panels. This meant the MDF panels didn’t have to be cut precisely to size. If you don’t have a router table, you should be able to drill some pocket holes in the panels and just screw them to the frame. Assuming it’s going to be painted, any small gaps can be caulked.
I realize this post is a couple years old, but how did you deal with the back top edge of the counter hitting the wall as it pivots up? Did you have to leave a gap between the back edge of the counter and the wall?
Yeh. I have 40mm at the back of the cabinet. I’m using “folding table hinges” to make the lid pivot 40mm from the wall. You can hopefully get the idea from the photos
Yes I see it now. Very helpful post. Thank you.